Introduction to git and GitHub
Jes Coyle
Key Points
In this lesson you will learn how to:
- Create and use a GitHub account to collaborate on our course website
- Set up a version-controlled RStudio project on your computer
- Use git to track and manage changes to files on your computer from RStudio
- Send changes to (local) files on your computer to a (remote) GitHub repository
Before we begin
Make sure that you have installed git on your computer. You will need both the program git and a command line shell to use the program. See the git installation instructions on the Computer Setup page. We will primarily focus on using git from RStudio.
What is GitHub?
GitHub is a website that provides access to files so that people collaborating on a project can work together. GitHub is organized around the idea of projects- a self-contained set of files that “do something”. Each project is called a repository and is accessed at the web url: https://github.com/name-of-project-owner/project-name. We will be using GitHub to manage changes to our course website which is owned by the FukamiLab organization and is stored in a project named BIO202. Thus, you can find all of the files that make our course website at https://github.com/FukamiLab/BIO202.
Anyone on the internet can see and download files from a GitHub repository (unless you pay to make it private). Keep this in mind when choosing which data to upload. However, you can restrict who is allowed to make changes to the files in your projects.
Creating a GitHub account
In order to use GitHub you will first need to create an account and give yourself a username so that you can create and work on projects. Go to https://github.com/ and on the main screen choose a username and password. You will need to check your email to confirm your regsitration.
Once you have registered an logged in using your new username and password you can get started. GitHub provides a nice tutorial on creating a new project repository here. Feel free to try out this tutorial on your own to learn how to make a repository for your class project.
Forking an existing repository
In order to contribute to the class website you will need to make a copy of the website project on your own account. This is called forking. Instead of creating a new project we want to “fork an existing repository”. Go to the class webpage GitHub project and click the “Fork” button in the upper right corner. You will want to fork the repository to your account. Notice that you are taken to the webpage https://github.com/your-username/BIO202.
Any changes you make to this fork will not show up on the class website because the website looks at the version of the files owned by FukamiLab. You will make changes to your fork and then propose these changes (as a pull request) to the FukamiLab fork. The instructors will then accept your changes to make them show up on the class website. We will get to this later in the lesson.
Editing files online
You can make changes to files in a project directly from your web browser. Let’s add your name to the webpage for the lesson that you will be leading.
Click on the Rmarkdown file (.Rmd) corresponding to the lesson that you will be leading. The first number gives the week and the letter refers to the class session (A-Mon, B-Wed, C-Fri). This will show you the partially rendered contents of the file. Because the text file is written in Rmarkdown, GitHub attempts to display the formatting that it understands. To see the underlying text you can click “Raw”.
To edit this file, click the pencil button in the upper right corner. You will be taken to an editor where you can then type your name alongside the instructor name at the top of the document. Save the changes by commiting them. In the box at the bottom, type a short description of the changes you made in the fist box. Then, commit the changes to the master branch by clicking the green “Commit” button.
You will not need to create new branches when working on our class website because each person will be making changes to their own fork. Branches are useful when you are working on different aspects of a project or when multiple users are contributing to the same project. However, we won’t be using them in our class. Everything you work on will be commited to the “master” branch.
Merging changes with a pull request
You have added your name to the lesson Rmd file in your fork of the class website. Next we will transfer these changes to the FukamiLab version. We will do this using a “pull request” which is a fancy name for proposing changes. You will propose to change FukamiLab/BIO202 based on the changes you made in your-username/BIO202.
Return to the main page of your fork at https://github.com/your-username/BIO202 and click the “New pull request” button. The base is what you are proposing to change and the head is where the changes are coming from. What should the base and head be if you want to propose the changes you just made?
You may need to click “compare across forks” to make the FukamiLab master branch show up as an option. Once you have selected the base (to) and head (from) branches you can scroll down to see how the files differ. Click the green “Create pull request” button to propose these changes. You will then be prompted to create a description of your changes so that a reviewer (e.g. the instructor) knows what to look for before accepting the changes. Click the green button again to create the request.
That’s it. Now someone will need to review your changes and accept them in order for the FukamiLab project to change.
While it is useful to be able to edit files online, usually you will want to make changes to files on your computer and then propose changes from these files to a project repository on GitHub. The best way to do this is by using a version control program called git. In the next section you will learn how to use git with RStudio to manages changes to a version of the class website files stored on your computer.
What is git?
Git is a program that tracks changes to files in a directory and allows you to revert to any previously saved state. Git is often used with a shell program that allows you to directly access the command line. We will be using git exclusively with RStudio. If you want to learn how to use git from the command line, I recommend working through the Software Carpentry git lessons that can be found here. You can also try the quick interactive tutorial from GitHub. We will use git to track the changes to a version of the course website files that will be stored on your computer. Git will also allow us to merge any changes you make on your computer to your fork on your GitHub account, which you can then merge with the official FukamiLab course repository using a pull request.
If you have never set up git on your computer, the first step is to tell git who you are. Open a shell program like GitBash (Windows) or Terminal (Mac). Type: git config --global user.name "Your Name" and press enter. Next type: git config --global user.email "your_email_address" and press enter.
Getting files from GitHub onto your computer
First we need to clone your version of the course website from your GitHub repository to a folder on your computer. Before doing so, think about where you want to save this project folder. It should be somewhere reasonable on your computer (i.e. not your Desktop or Downloads) and you should not move this folder once it is set up, so choose its location carefully. Next we will clone your fork of the class website repository from GitHub into this folder. You can do this directly from RStudio (the easiest way) or you can do this from the command line.
Using RStudio
- Open RStudio and click File > New Project.
- Click Version Control and then Git.
- If you don’t see this option and have installed git according to the instructions you need to tell RStudio where to find the git program on your computer. Instructions:
- Go to Tools > Global Options > Git/SVN
- If there is nothing in the line for the Git executable shows (none), click Browse and select the git executable installed on your system. On a Mac, this will likely be one of /usr/bin/git , /usr/local/bin/git , or /usr/local/git/bin/git . On Windows, git.exe will likely be in C:\Program Files (x86)\git\bin or C:\Program Files\git\bin.
- Windows users may need to edit the system path so that Windows can find git. Instructions:
- Go to System Properties > Advanced System Settings > Environment Variables
- Select Path > Edit
- In the next window, add a line containing the path to the git executable (see above) and click OK.
- If those instructions don’t work try Googling “Windows edit PATH”.
- If you don’t see this option and have installed git according to the instructions you need to tell RStudio where to find the git program on your computer. Instructions:
- Copy the url of your fork of the class website repository into the line marked “Repository URL”. This should look like: https://github.com/your-username/BIO202.
- Name the project directory whatever you like (no spaces!). BIO202_website would be a good name.
- Choose the folder where you want to save the project folder by clicking Browse. Finish by clicking “Create Project”.
Using the command line
- Navigate to the location on your computer where you want to save the website files and create a new folder to hold them (no spaces in the name!). A good project folder name would be BIO202_website.
- Open a shell program lile GitBash (Windows) or Terminal (Mac). This will open an empty window with a blinking cursor.
- Navigate to the project folder that you just created using the
cdcommand:cd ~/path/to/folder/folder_name. Here’s how you find the path to your project folder:- On Windows:
- Use the file explorer to navigate so that you can see the folder you just created (do not navigate to the inside of the folder).
- Right click on the bar at the top that lists the folders hierarchically and select “copy address”. Or, Ctrl+click to highlight the path and copy what is highlighted.
- Paste this in front of the
cdcommand. - Change all
\to/. Then press ENTER.
- On Mac:
- Use the Finder to navigate so that you can see the folder you just created.
- Right click (or Ctrl+click or two-finger click) on the folder.
- Hold down the OPTION key and select “Copy (folder name) as Pathname”.
- Paste this in front of the cd command and press ENTER.
- On Windows:
- Use your web browser to go to your fork of the class website repository. It should be at https://github.com/your-username/BIO202.
- Click the green “Clone or download” button in the upper right. This will display a url. Copy this url.
- At the command line (in the shell program) type
git clone, then paste the url you copied from GitHub, then type the name of your project folder. If you named the folder “BIO202_website”, it should look like:git clone https://github.com/your-username/BIO202 BIO202_website. - Press ENTER. Lots of stuff should happen. When you navigate to the project folder you should now see lots of files.
- Open RStudio and create a new Project from an Existing Directory.
- Browse to the project directory you created which now contains the files downloaded from your GitHub repository.
Editing and saving local files
Open this new version-controlled RStudio project and open the file 02-C-student-projects.Rmd. Add an entry to this file for your project that you will work on for class. To save your changes and see what the Rmd file will look like as a webpage, click the “Knit” button at the top of the script window.
You have now made changes to the local files on you computer. Next you need to track these changes with git. To do this, click on the button on the top bar that has a green plus over a red minus over a grey circular arrow. Choose “Commit” from the drop down menu.
This will open a new window that shows you all of the files that have changed since your last “commit”. First you need to select the files that you want to “stage”. This means that any changes made to these files will be recorded in this “commit”. A “commit” is a record of a set of changes. You can revert files back to the state that they were in at any particular “commit”. I would suggest staging both the .Rmd file and its accompanying .html file at the same time, since the changes you made to the Rmd file caused the changes in the html file. Click the checkbox next to the files you want to stage for this commit. Then type a brief and specific message in the Commit message box about the changes you made. Notice that the bottom window shows you the differences between the current version of the file you selected and the most recently commited version. Click the commit button when you are satisfied.
To see all previous commits, click the “History” tab at the top of the git window. You can select any commit and see which files were changed and the changes within these files.
Reverting changes
If you have made changes to files and saved them, but have not yet committed these changes, you can revert back to the last commit by selecting “Revert” from the git menu in RStudio. However, if you want to change the files back to the state they were in at a previous commit you will need to use the command line.
If you want to learn more about using git from the command line, try this quick tutorial.
Sending changes to GitHub
To send the committed changes you have made to the files on your computer to your GitHub repository, select “Push branch” from the git menu in RStudio. Then go online to http://github.com/your-username/BIO202 to see that the files have been updated.
Finally, submit a pull request on GitHub to send these changes to the FukamiLab repository. We will see what happens when multiple people try to merge changes to the same file.
Workflow Summary
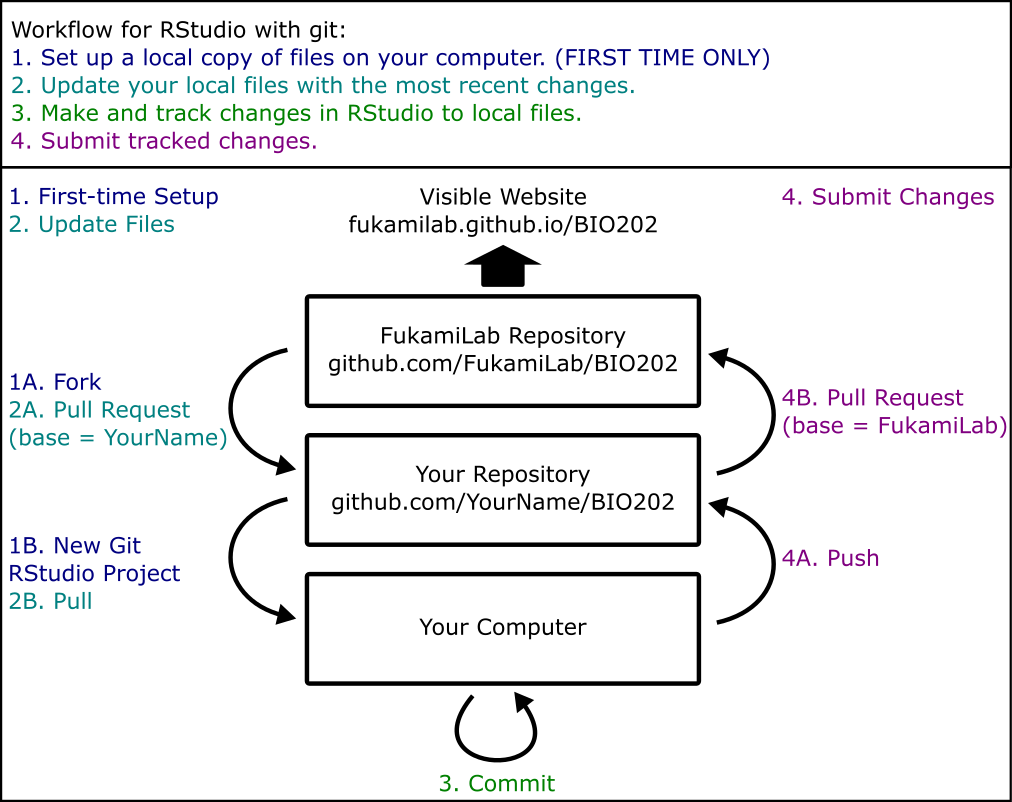
Workflow for editing the course website with git in RStudio