Setting up your computer
R and RStudio
R and RStudio are separate downloads and installations. R is the underlying statistical computing environment, but using R alone is no fun. RStudio is a graphical integrated development environment (IDE) that makes using R much easier and more interactive. You need to install R before you install RStudio. In the sections below are the instructions for installing R and R Studio on your operating system.
Windows
If you already have R and RStudio installed
- Open RStudio, and click on “Help” > “Check for updates”. If a new version is available, quit RStudio, and download the latest version for RStudio.
- To check which version of R you are using, start RStudio and the first thing that appears in the console indicates the version of R you are running. Alternatively, you can type
sessionInfo(), which will also display which version of R you are running. Go on the CRAN website and check whether a more recent version is available. If so, please download and install it. You can check here for more information on how to remove old versions from your system if you wish to do so.
If you don’t have R and RStudio installed
- Download R from the CRAN website.
- Run the
.exefile that was just downloaded - Go to the RStudio download page
- Under Installers select RStudio x.yy.zzz - Windows XP/Vista/7/8 (where x, y, and z represent version numbers)
- Double click the file to install it
- Once it’s installed, open RStudio to make sure it works and you don’t get any error messages.
macOS
If you already have R and RStudio installed
- Open RStudio, and click on “Help” > “Check for updates”. If a new version is available, quit RStudio, and download the latest version for RStudio.
- To check the version of R you are using, start RStudio and the first thing that appears on the terminal indicates the version of R you are running. Alternatively, you can type
sessionInfo(), which will also display which version of R you are running. Go on the CRAN website and check whether a more recent version is available. If so, please download and install it.
If you don’t have R and RStudio installed
- Download R from the CRAN website.
- Select the
.pkgfile for the latest R version - Double click on the downloaded file to install R
- It is also a good idea to install XQuartz (needed by some packages)
- Go to the RStudio download page
- Under Installers select RStudio x.yy.zzz - Mac OS X 10.6+ (64-bit) (where x, y, and z represent version numbers)
- Double click the file to install RStudio
- Once it’s installed, open RStudio to make sure it works and you don’t get any error messages.
Linux
- Follow the instructions for your distribution from CRAN, they provide information to get the most recent version of R for common distributions. For most distributions, you could use your package manager (e.g., for Debian/Ubuntu run
sudo apt-get install r-base, and for Fedorasudo yum install R), but we don’t recommend this approach as the versions provided by this are usually out of date. In any case, make sure you have at least R 3.3.1. - Go to the RStudio download page
- Under Installers select the version that matches your distribution, and install it with your preferred method (e.g., with Debian/Ubuntu
sudo dpkg -i rstudio-x.yy.zzz-amd64.debat the terminal). - Once it’s installed, open RStudio to make sure it works and you don’t get any error messages.
Editing the Course Website
The course website can be edited by changing the html files in the course GitHub repository located at https://github.com/FukamiLab/BIO202.
Rules for structuring your Rmd file
If you follow these rules then anyone should be able to render your Rmd file without changing any of the code. The repository working directory is the working directory of thr .Rproj file and it contains all of the .Rmd and .html files used to make the website.
DO
Use example data files that have already been (mostly) cleaned and formatted. This reduces the time it takes to render the Rmd file after small changes.
- Two options for saving data:
- Save your data files in a folder called “data/” in the repository working directory.
- If you are using git to interact with the course website and you do not want your data to be tracked and saved on GitHub, then open the “.gitignore” file and add the path to your data file on a new line: “data/your_data_filename.csv”. Then, send the data file to Jes so she can add it to Canvas for other to use.
- If you are using git and you want your data to be tracked and saved on GitHub, then make sure your commit the data file and push it to the repository.
- If you are not using git, then send your data file to Jes and tell her whether you want it to be public (on GitHub) or not (on Canvas).
- Upload your data file directly to the data folder on our GitHub repository.
- Save your data files in a folder called “data/” in the repository working directory.
- Save images that you reference with
inside the folder called “images/” and then reference them with.- If you are using git, then make sure your commit the image file and push it to the repository.
- If you are not using git, then send your image file to Jes.
Use file paths that are relative to the repository working directory. E.g.
read.csv("data/my_data.csv")orload("data/my_rdata.RData"). Even better, read data directly from the GitHub repository (if the data is public):read.csv(file.path(repo_url, "data/filename.csv")). Note thatrepo_urlis a variable that is defined in all of the lesson pages.Give instructions for where to find any packages that cannot be installed from CRAN using
install.packages().
DO NOT
- Change the working directory.
- Use file paths that are specific to your computer.
- Run analyses that take longer than ~ 2 min. If you need to run longer analyses, save the output as an RData file and then load it using
load("analysis_output.RData").
If you don’t want to work with git
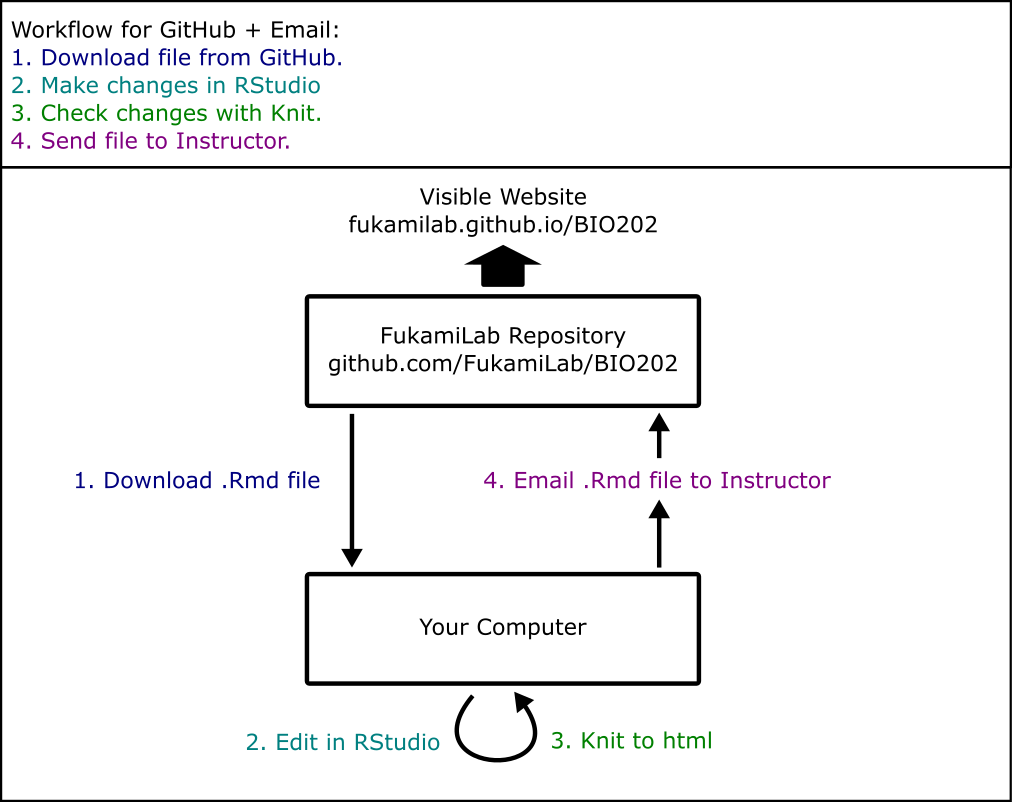
Workflow for editing the course website without git
- Go to the course GitHub repository above.
- Click on the .Rmd file for the lesson you want to edit.
- Click the Raw button in the upper right corner.
- When the page with text opens, download the file and save it as a .Rmd file. Make sure to remove any .txt extensions that may be automatically added.
- Open and edit the .Rmd file in R Studio. Use the ‘Knit’ button to convert the file to an html to check your changes.
- When you as satisfied, email the .Rmd file to Jes no later than 8 am on the day you present. You must also email any data or image files that are not generated by the R code.
If you are new to git, but want to learn
- Install Git on your computer using the instructions in the section below.
- Attend the Git tutorial during class on Wednesday, October 4th (week 2). We will go over how to use git from RStudio.
- Use the following diagram to remember the workflow:
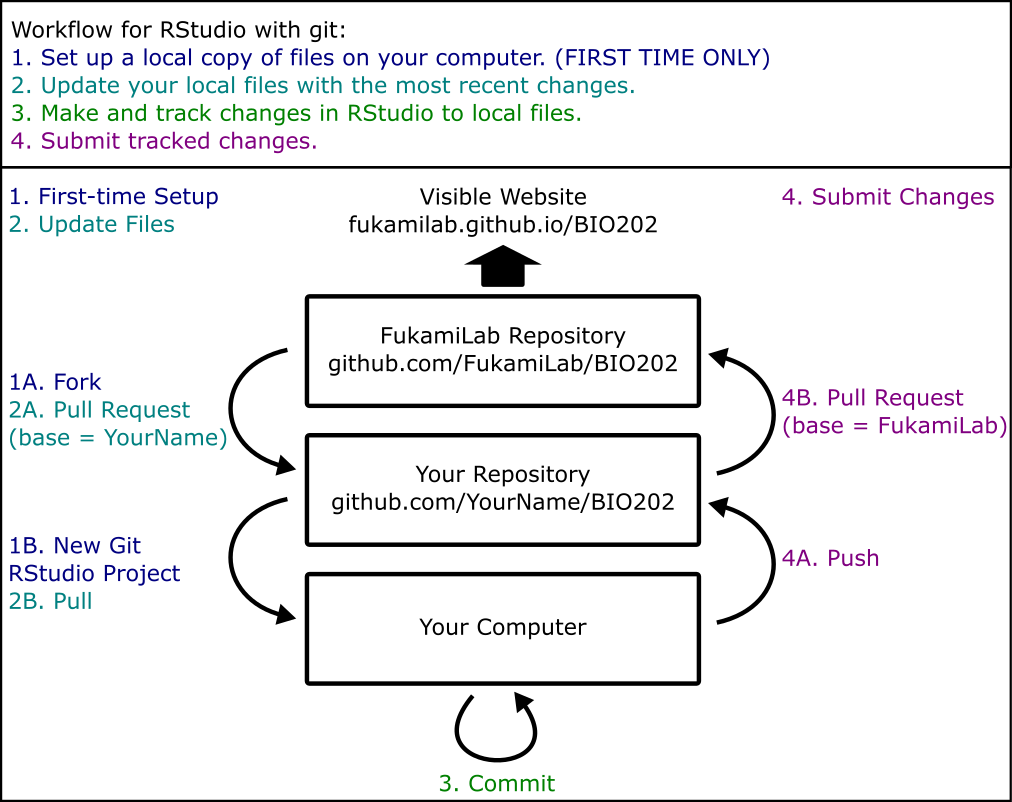
Workflow for editing the course website with git in RStudio
If you are familiar with git
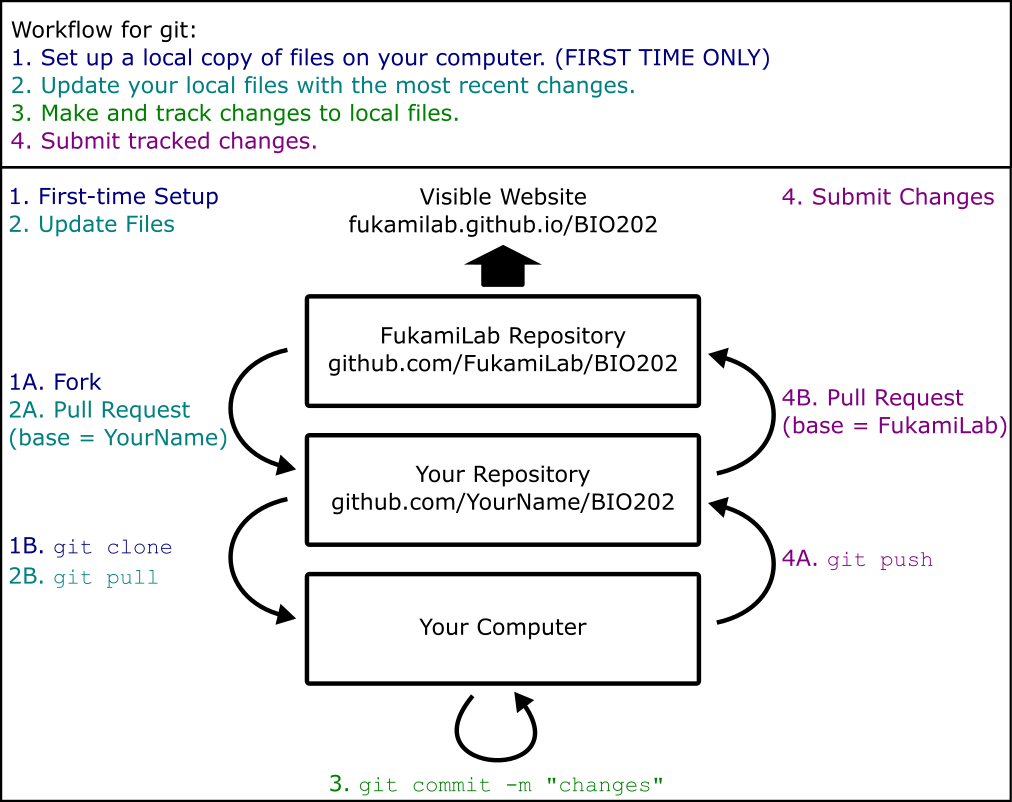
Workflow for editing the course website with git
- If you have not aready done so, fork the repository from https://github.com/FukamiLab/BIO202 to your account on GitHub. Then clone a local copy of this forked repository (from your own GitHub account) to your computer. This only needs to be done once.
- Before you start working:
- Make sure your copy is up to date with the FukamiLab repository on GitHub by submitting a pull request.
- Make sure your local repository on your computer is up to date with your fork of the repository on your GitHub account using
git pull.
- Work on the .Rmd file for your lesson in R Studio on your computer. Click ‘Knit’ to render your changes as an html file and view them in your browser. Note that any edits you make are only on your computer until you submit a pull request to merge your changes to the repository. Make sure that when you have made your last edit to the .Rmd file you click ‘Knit’ so that an up-to-date html file is generated. The html file will be the one that appears on the website.
- Commit the changes you make periodically to your local repository using
git commit -m "changes you made". - When you are finished, push the commits from your local repository to your fork on your GitHub account using
git push origin master. - Submit a pull request on GitHub to merge the changes on your fork with the original BIO202 repository on FukamiLab no later than 8 am on the day you present. Jes or Tad will approve your pull request.
If you are not sure how to do any of the steps listed above, you can find instructions on the lesson page for Wednesday, October 4th.
Git
Windows
- Download the git installer for Windows here. This will install bash, which is a command-line shell program for interacting with files and programs on your computer.
- Run the installer that you just downloaded. Click “Next” as needed and when you get to the following options make sure that you:
- Select “Use Git from the Windows Command Prompt”.
- Keep “Checkout Windows-style, commit Unix-style line endings” selected.
- Select “Use Windows’ default console window”.
- If you forgot to do any of these, rerun the installer and select the appropriate options.
- That’s it! You should now have three new programs installed in a folder called Git under your Program Files.
macOS
Follow the instructions below or view this video tutorial.
- Go to this list and download an installer for Git.
- If you are using OS X 10.9 and higher, choose the most recent version for “mavericks”.
- If you are using an earlier version of OS X, choose the most recent version for “snow leopard”.
- Run the installer you downloaded.
- After installing Git, there will not be anything in your /Applications folder, because Git is a command line program.
Note: if you have OSX El Capitan you may experience some errors when running Git if you don’t have an updated XCODE. Here is a description of the issue on StackOverflow and the solution is to open a Terminal window and type xcode-select --install.
Linux
You may already have Git installed. If not, you can try to install it via your distro’s package manager. For Debian/Ubuntu run sudo apt-get install git and for Fedora run sudo yum install git.
Attribution
The content of this webpage was derived from Data Carpentry and Software Carpentry materials (Copyright (c) Data Carpentry) under CC-3.0 Attribution License (see http://creativecommons.org/licenses/by/3.0/).